
Introduction to drawing proportions
This lesson is an introduction of a series about drawing proportions. It will mostly talk about basic concepts now, while talking in details about each aspect of these in the upcoming lessons.
The most key aspect when it comes to getting things right is to practice what you learned after each lesson. So I highly advice to follow any exercise I give you. It’s not far-fetched to ask you to spend at least 5-6 hours of practicing for each 30 minutes to spend reading my posts, as just reading this blog won’t get you better at drawing.
While you can get proportions right using rulers & other measuring devices, your end goal should be to train your eyes to do the measurement mostly by itself, or as close to that as possible. For a starter, you can simply use such measuring tools to help you understand the different proportions of the object you’re drawing, particularly when it comes to drawing complex objects you will draw often & get good at, like the human body. Once you find yourself able to draw your object right, you can get to depend on your own measurement while you draw.
Since the most common topic when it comes to proportions is the human body, and because that’s what many artist draw in one form or another. I plan on have dedicated lessons for it in this series. But for now, let’s just do with simple shapes.
When we say proportions, what exactly do we mean?
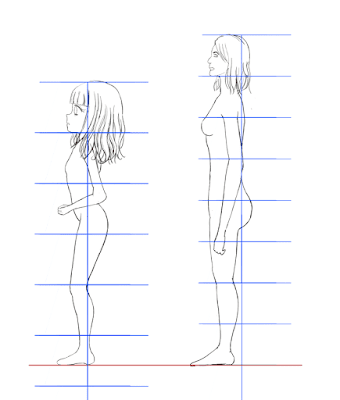
As a term, proportions is used to refer to the size relationship between the different objects in a drawing. Like the size of the human head compared to the rest of the body. But it is also used to measure any relationship between two objects, like the angle between them, as well as their alignment.
Learning how to drawing proportions right has many applications. The same skills of measuring proportions you learn can be used to place your objects at the middle of the drawing (or to place the nose at the middle of the head). If you struggle with drawing hands, improving your proportions measuring skills will make it easier for you to draw them. Proportions can also makes it easier to draw in perspective, which is another key aspect you should learn, as it can boost your drawing abilities.
No matter what art style you’re drawing, you will need to know some sort of method to make sure your proportions are good. Be it a human body or Anime, or anything else.
Fortunately, It Gets Better After Some Time
At first you will find yourself taking more time measuring the relationships between the objects of your drawing, and your measurement will be off often in the final drawing. The good news is, the more you do it, the less you will find yourself measuring, and the more accurate your final drawing will be. As long as you kept at measuring on your own.
I highly advice you to pick a certain picture, and to draw it over & over. Until you get it right, then do the same for another drawing. The amount of time you have redo the drawing depends on your current skills level, which will simple raise with practice.
Different Types Of Relationships
 As I said earlier. Proportions are more than just the size relationships between objects, as there are other types of relationships to take note of. Let’s take a closer look at each of them
1. Size Relationship
By observing the different in size between the different objects in your drawing. You can get to copy any drawing accurately, and to lay down the basic guidelines for your drawing if you’re drawing from imagination.
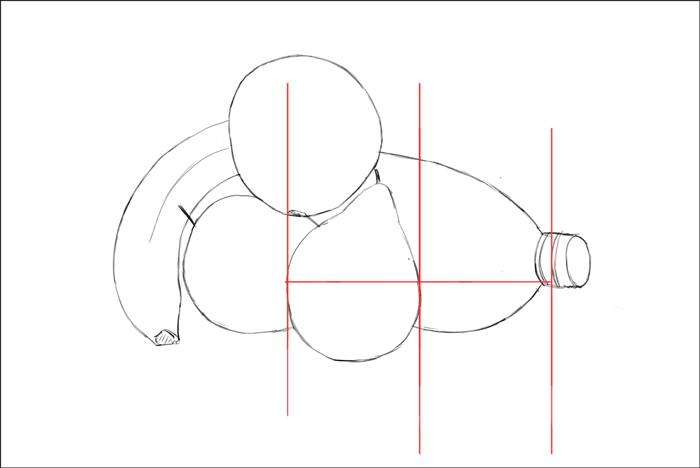
To take the following picture in example, the size of the apple is 5/6 the size of the orange, you can see that from the ticks I added to the picture. Note how the apple is vertically aligned to the orange.

2. Angle Relationship
Angles relationships is all about measuring the angle between any two objects or lines in the drawing. In my opinion, this is the second most important relationship to look at.
In our fruits picture, there’s about 45°-55° angle between the edges of the orange & the water bottle.

There’s also approximately 45° between the edge of the orange & the banana.

3. Alignment Relationship
Alignment relationship tells us where two objects in the picture are placed in relationship with each other. To Take a closer look at the orange & apple relationship, there is a half a tick between placement the orange & apple.
You can see that when we have the tick displayed right here.
 Alignment relationships is super useful when you get lay down the objects your drawing. As it determines where to start drawing the second object after you’re done from the first (the orange & the apple in this case).
Let’s Practice Drawing Proportions, Drawing The Fruits Picture
To avoid making the whole lesson a theory. I will show you how to draw the fruits example above, while keeping the proportions as close to the original picture as possible. The goal is to show you how comparing the different sizes & angles can help you draw accurately.
It’s worth noting that the measurements I used here are not the only possible way to go about for drawing the fruit, but just what I thought are the best. For that reason, you don’t have to follow the exact same order I did in this exercise.
I chose to start with the orange, since it’s right at the middle of the picture. And it’s completely visible as well. I tried my best to make the orange as close to the original as possible. If you are having a hard time drawing the orange, then I suggest you practice drawing basic shapes, as it’s a simple but key drawing skill.

I used the height of the orange as measuring tool. Drawing the ticks as you see below can help you if you’re starting out. Doing the drawing without drawing the ticks is something you should strive for with practice.

I used the tick to help me draw the apple. Again, as close to the original as possible.

Note how the edge of the apple stops where the navel ends. I know that by observing the picture I am drawing. Even if the navel and the apple edge are not 100% aligned, I could still have used it to do the drawing, or I would have found another landmark.

The same way, I drew the pear using the same line as a guide. Since I already have the orange & apple drawn. I can use them to help me draw the pear right. The issue with that approach is that any mistake I made while drawing the orange & apple will affect the pear.

I can use the angle between the orange & the pear to help me test whether I drew the pear too big or too small.

I drew the rest of the apple here. The part that’s between the orange & the pear.

Now I drew the banana, which’s tarts at the middle of the orange. Do you know what part of the drawing I depended on?

Here, I used the negative space between the orange, apple & the banana, which tells me what the distance should be between them at any given location.

Negative space is another drawing concept that I plan on focusing on. One that makes it easier to observe a drawing & draw it exactly how you see it.
I drew the water bottle next. Again, can you tell what measurement I used to draw it this time?

I used the width of the pear to make sure the width of the bottle is accurate.

I also used the angle of bottle itself can be used to draw it.

The angle between the bottle & orange are a good way to make sure you drew the bottle right.

Here’s the final drawing. Feel free to repeat the exercise multiple of times. It may seem like an easy example, but the lack of landmarks between the different fruits in many cases will force you to train your own measurements.

The most key aspect when it comes to getting things right is to practice what you learned after each lesson. So I highly advice to follow any exercise I give you. It’s not far-fetched to ask you to spend at least 5-6 hours of practicing for each 30 minutes to spend reading my posts, as just reading this blog won’t get you better at drawing.
While you can get proportions right using rulers & other measuring devices, your end goal should be to train your eyes to do the measurement mostly by itself, or as close to that as possible. For a starter, you can simply use such measuring tools to help you understand the different proportions of the object you’re drawing, particularly when it comes to drawing complex objects you will draw often & get good at, like the human body. Once you find yourself able to draw your object right, you can get to depend on your own measurement while you draw.
Since the most common topic when it comes to proportions is the human body, and because that’s what many artist draw in one form or another. I plan on have dedicated lessons for it in this series. But for now, let’s just do with simple shapes.
When we say proportions, what exactly do we mean?
As a term, proportions is used to refer to the size relationship between the different objects in a drawing. Like the size of the human head compared to the rest of the body. But it is also used to measure any relationship between two objects, like the angle between them, as well as their alignment.

Learning how to drawing proportions right has many applications. The same skills of measuring proportions you learn can be used to place your objects at the middle of the drawing (or to place the nose at the middle of the head). If you struggle with drawing hands, improving your proportions measuring skills will make it easier for you to draw them. Proportions can also makes it easier to draw in perspective, which is another key aspect you should learn, as it can boost your drawing abilities.
No matter what art style you’re drawing, you will need to know some sort of method to make sure your proportions are good. Be it a human body or Anime, or anything else.
Fortunately, It Gets Better After Some Time
At first you will find yourself taking more time measuring the relationships between the objects of your drawing, and your measurement will be off often in the final drawing. The good news is, the more you do it, the less you will find yourself measuring, and the more accurate your final drawing will be. As long as you kept at measuring on your own.
I highly advice you to pick a certain picture, and to draw it over & over. Until you get it right, then do the same for another drawing. The amount of time you have redo the drawing depends on your current skills level, which will simple raise with practice.
Different Types Of Relationships
1. Size Relationship
By observing the different in size between the different objects in your drawing. You can get to copy any drawing accurately, and to lay down the basic guidelines for your drawing if you’re drawing from imagination.
To take the following picture in example, the size of the apple is 5/6 the size of the orange, you can see that from the ticks I added to the picture. Note how the apple is vertically aligned to the orange.
2. Angle Relationship
Angles relationships is all about measuring the angle between any two objects or lines in the drawing. In my opinion, this is the second most important relationship to look at.
There’s also approximately 45° between the edge of the orange & the banana.
3. Alignment Relationship
Alignment relationship tells us where two objects in the picture are placed in relationship with each other. To Take a closer look at the orange & apple relationship, there is a half a tick between placement the orange & apple.
You can see that when we have the tick displayed right here.
Let’s Practice Drawing Proportions, Drawing The Fruits Picture
To avoid making the whole lesson a theory. I will show you how to draw the fruits example above, while keeping the proportions as close to the original picture as possible. The goal is to show you how comparing the different sizes & angles can help you draw accurately.
It’s worth noting that the measurements I used here are not the only possible way to go about for drawing the fruit, but just what I thought are the best. For that reason, you don’t have to follow the exact same order I did in this exercise.
I chose to start with the orange, since it’s right at the middle of the picture. And it’s completely visible as well. I tried my best to make the orange as close to the original as possible. If you are having a hard time drawing the orange, then I suggest you practice drawing basic shapes, as it’s a simple but key drawing skill.
I used the height of the orange as measuring tool. Drawing the ticks as you see below can help you if you’re starting out. Doing the drawing without drawing the ticks is something you should strive for with practice.
I used the tick to help me draw the apple. Again, as close to the original as possible.

Note how the edge of the apple stops where the navel ends. I know that by observing the picture I am drawing. Even if the navel and the apple edge are not 100% aligned, I could still have used it to do the drawing, or I would have found another landmark.

The same way, I drew the pear using the same line as a guide. Since I already have the orange & apple drawn. I can use them to help me draw the pear right. The issue with that approach is that any mistake I made while drawing the orange & apple will affect the pear.

I can use the angle between the orange & the pear to help me test whether I drew the pear too big or too small.

I drew the rest of the apple here. The part that’s between the orange & the pear.

Now I drew the banana, which’s tarts at the middle of the orange. Do you know what part of the drawing I depended on?

Here, I used the negative space between the orange, apple & the banana, which tells me what the distance should be between them at any given location.

Negative space is another drawing concept that I plan on focusing on. One that makes it easier to observe a drawing & draw it exactly how you see it.
I drew the water bottle next. Again, can you tell what measurement I used to draw it this time?

I used the width of the pear to make sure the width of the bottle is accurate.
I also used the angle of bottle itself can be used to draw it.

The angle between the bottle & orange are a good way to make sure you drew the bottle right.

Here’s the final drawing. Feel free to repeat the exercise multiple of times. It may seem like an easy example, but the lack of landmarks between the different fruits in many cases will force you to train your own measurements.

Comments
Post a Comment